# 後端
- 需要一個
Review的 endpoint 來處理產品評論的新增邏輯 - 需要客製化
Product的serializer在產品的 JSON 格式中加入該產品的評論
先回顧一下 Review 的 model,每個評論都有一個 product 來指向該評論的產品,並有一個 user 來指向該評論的使用者,並有一個 rating 來表示評分,comment 來表示評論內容,createdAt 來表示評論的時間。
class Review(models.Model):
    product = models.ForeignKey(Product,on_delete=models.CASCADE,null=True) # 當產品被刪除,此產品的評論也一併刪除
    user = models.ForeignKey(User,on_delete=models.SET_NULL,null=True)
    name = models.CharField(max_length=50,null=True,blank=True)
    rating = models.IntegerField(null=True, blank=True,default=0)
    comment = models.TextField(null=True, blank=True)
    createdAt = models.DateTimeField(auto_now_add=True)

    def __str__(self) -> str:  # 讓後台能顯示產品名稱,否則只會顯示 Product Object(1)
        return str(self.rating)
# views
這邊會有 3 種情況需要去撰寫程式邏輯:
- 評論已經存在,避免同一個使用者多次重複評論
- 評論沒有選擇星數(rating)或星數為 0
- 成功新增評論
成品大致會如下:
另外也要在新增評論後,重新計算該產品的評分,rating 的計算方式為 總(rating)評分數 / 評論數量
# 用戶發表產品評論
@api_view(['POST'])
def createProductReview(request, pk):
user = request.user
product = Product.objects.get(id=pk)
data = request.data
print("data:", data)
# 檢查用戶是否已經評論過該產品
alreadyExists = product.review_set.filter(user=user).exists()
if alreadyExists:
content = {'detail': '您已經評論過該產品'}
return Response(content, status=400)
# 檢查評論的 Rating 是否存在或為 0
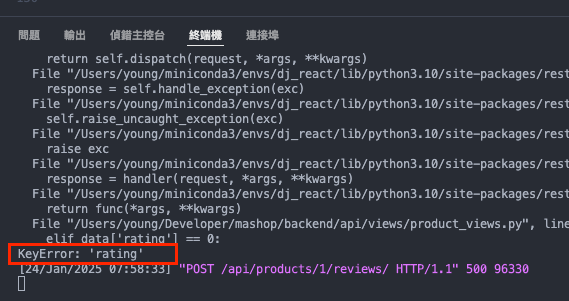
elif data['rating'] == 0:
content = {'detail': '請選擇評分'}
return Response(content, status=400)
else:
review = Review.objects.create(
user=user,
product=product,
name=user.first_name,
rating=data['rating'],
comment=data['comment'],
)
# 新增評論,並計算、更新評論數量和評分
reviews = product.review_set.all()
product.numReviews = len(reviews)
# 計算評分
total = 0
for i in reviews:
total += i.rating
product.rating = total / len(reviews)
product.save()
return Response('評論發表成功!')# urls
path('<str:pk>/reviews/', views.createProductReview, name="create-review"),# Postman 測試
基本上直接對 api/products/1/reviews/ 請求會看到以下錯誤,因為沒有帶 rating 及 comment 的值:
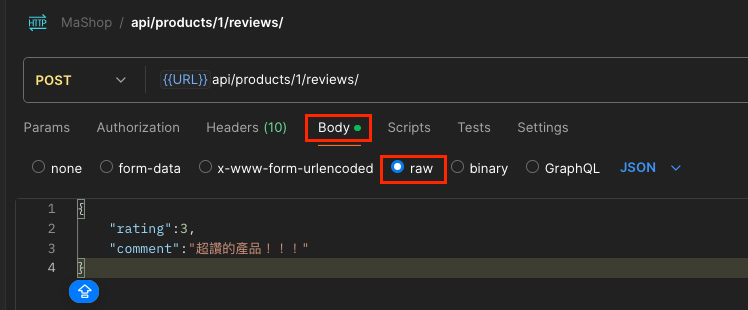
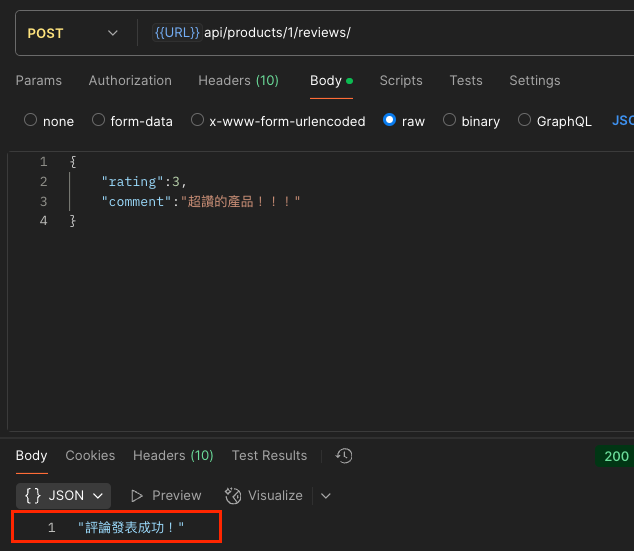
所以在 Postman -> Body -> raw 這設定 rating 的值:
{
 "rating": 3,
 "comment": "超讚的產品!!!"
}
然後就能看到後端回傳新增評論成功的 JSON 訊息:
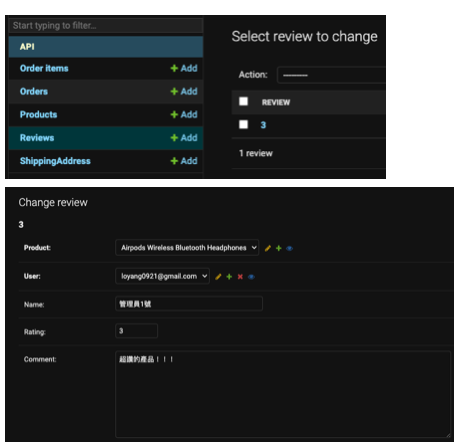
此時到 Django 後台就可以看到新增的評論:
所以接下來目標就是要將這個評論顯示在產品頁面上,
目前 api/products/1 的回傳:
{
 "id": 1,
 "name": "Airpods Wireless Bluetooth Headphones",
 "image": "/images/airpods.jpg",
 "brand": "Apple",
 "category": "Electronics",
 "description": "超酷藍芽耳機,價格不親民,請三思。",
 "rating": "3.00",
 "numReviews": 1,
 "price": 7790,
 "countInStock": 6,
 "createdAt": "2023-01-10T09:28:44.460000Z",
 "user": 1
}
所以必需要建立一個 serializer 來取得該產品的評論,這個 serializer 會用到 Review 的 serializer,所以先建立一個 ReviewSerializer:
# serializers
- 先寫一個
ReviewSerializer的 class 來將取得Review的所有欄位序列化為 JSON 格式 get_reviews命名是 DRF SerializerMethodField 的設計規範,get_後面接欄位名稱,這樣SerializerMethodField才能正確的將這個欄位序列化為 JSON 格式
# serializers.py
from .models import Product,..., Review

class ReviewSerializer(serializers.ModelSerializer):
    class Meta:
        model = Review
        fields = '__all__'

class ProductSerializer(serializers.ModelSerializer):
    reviews = serializers.SerializerMethodField(read_only=True)
    class Meta:
        model = Product
        fields = '__all__'

    def get_reviews(self, obj):
        reviews = obj.review_set.all()
        serializer = ReviewSerializer(reviews, many=True)
        return serializer.data
順便複習一下 SerializerMethodField 的用法及使用場景:SerializerMethodField 可以在不用真的去動到資料庫的情況下,動態生成暫時性的欄位,如果不用 SerializerMethodField,就必須要在 Product 的 serializer 中加入 reviews = ReviewSerializer(many=True):
class ProductSerializer(serializers.ModelSerializer):
    reviews = ReviewSerializer(many=True, read_only=True)  # 直接指定關聯序列化器

    class Meta:
        model = Product
        fields = '__all__'
這樣就會在取得 Product 的時候,一併取得該產品的評論,會增加資料庫的查詢次數,所以使用 SerializerMethodField 來動態生成暫時性的欄位,可以減少資料庫的查詢次數,增加效能。
在 ProductSerializer 新增完 reviews後的 api/products/1 回傳:
{
    "id": 1,
    "reviews": [
        {
            "id": 1,
            "name": "管理員1號",
            "rating": 3,
            "comment": "超讚的產品!!!",
            "createdAt": "2025-01-24T08:05:28.281674Z",
            "product": 1,
            "user": 1
        }
    ],
    "name": "Airpods Wireless Bluetooth Headphones",
    "image": "/images/airpods.jpg",
    "brand": "Apple",
    "category": "Electronics",
    "description": "超酷藍芽耳機,價格不親民,請三思。",
    "rating": "3.00",
    "numReviews": 1,
    "price": 7790,
    "countInStock": 6,
    "createdAt": "2023-01-10T09:28:44.460000Z",
    "user": 1
}
# 前端
# constants(宣告常數)
// constants/productConstants.js
export const PRODUCT_CREATE_REVIEW_REQUEST = "PRODUCT_CREATE_REVIEW_REQUEST";
export const PRODUCT_CREATE_REVIEW_SUCCESS = "PRODUCT_CREATE_REVIEW_SUCCESS";
export const PRODUCT_CREATE_REVIEW_FAIL = "PRODUCT_CREATE_REVIEW_FAIL";
export const PRODUCT_CREATE_REVIEW_RESET = "PRODUCT_CREATE_REVIEW_RESET";
# reducers(狀態管理)
// reducers/productReducers.js
export const productCreateReviewReducer = (state = {}, action) => {
 switch (action.type) {
  case PRODUCT_CREATE_REVIEW_REQUEST:
   return { loading: true };
  case PRODUCT_CREATE_REVIEW_SUCCESS:
   return { loading: false, success: true };
  case PRODUCT_CREATE_REVIEW_FAIL:
   return { loading: false, error: action.payload };
  case PRODUCT_CREATE_REVIEW_RESET:
   return {};
  default:
   return state;
 }
};
# actions(發送請求)
// actions/productActions.js
// 用戶新增產品評論
export const createProductReview = (productId, review) => async (dispatch, getState) => {
 try {
  dispatch({
   type: PRODUCT_CREATE_REVIEW_REQUEST,
  });

  const {
   userLogin: { userInfo },
  } = getState();

  const config = {
   headers: {
    "Content-type": "application/json",
    Authorization: `Bearer ${userInfo.token}`,
   },
  };

  const { data } = await axios.post(`/api/products/${productId}/reviews/`, review, config); // 送出評論

  dispatch({
   type: PRODUCT_CREATE_REVIEW_SUCCESS,
   payload: data,
  });
 } catch (error) {
  dispatch({
   type: PRODUCT_CREATE_REVIEW_FAIL,
   payload: error.response && error.response.data.detail ? error.response.data.detail : error.message,
  });
 }
};
# 詳細產品前端頁面
- 要登入才能評論,否則就顯示登入連結,所以這邊一樣將
userInfo從state中取出 - 用戶評論完畢後,重新刷新產品詳細資訊,所以在
useEffect中的依賴陣列加入successCreateReview - 用戶評論完畢後,清空
rating及comment的值,並且重置PRODUCT_CREATE_REVIEW的狀態
...
const [rating, setRating] = useState(1);
const [comment, setComment] = useState("");

const { userInfo } = useSelector((state) => state.userLogin);

const productCreateReview = useSelector((state) => state.productCreateReview);
const { loading: loadingCreateReview, error: errorCreateReview, success: successCreateReview } = productCreateReview;

useEffect(() => {
 if (successCreateReview) {
  setRating(1);
  setComment("");
  dispatch({ type: PRODUCT_CREATE_REVIEW_RESET });
 }
 dispatch(listProductDetail(id));
}, [dispatch, id, successCreateReview]);

...
const submitReviewHandler = (e) => {
 e.preventDefault();
 dispatch(createProductReview(product.id, { rating, comment }));
};
# 評論表單部分
判斷若尚未有任何評論,就顯示沒有評論的訊息
<Row className='my-3'>
<Col md={6}>
<h2>商品評價</h2>
<ListGroup>
{product.reviews.length === 0 && <Message variant='info'>目前還沒有評論~</Message>}
{product.reviews.map((review) => (
<ListGroup.Item key={review.id}>
<div className='my-2 text-bold'>用戶名稱:{review.name}</div>
<div className='my-2'>
<Rate value={review.rating} color={`#f8e825`} />
</div>
<div className='my-2'>{review.createdAt.substring(0, 10)}</div>
<div className='my-2'>{review.comment}</div>
</ListGroup.Item>
))}
...
</ListGroup>
</Col>
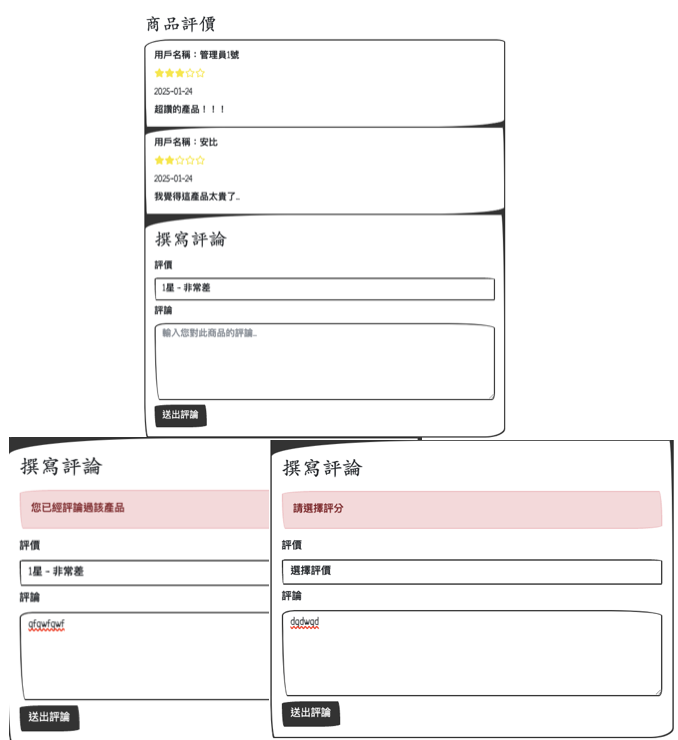
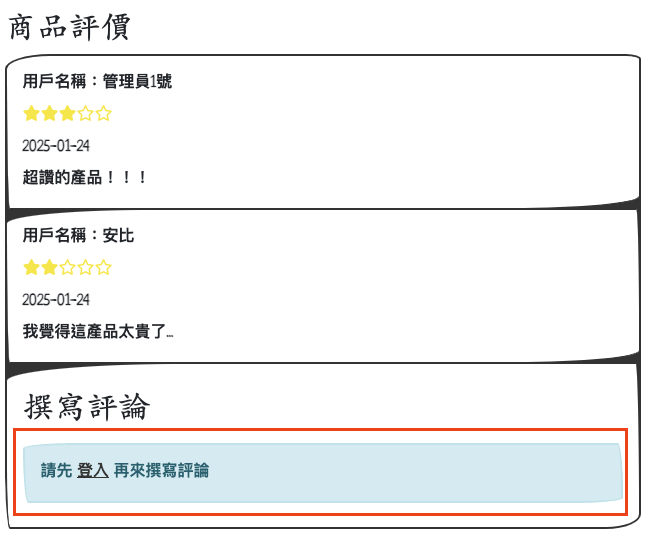
</Row>判斷若未登入,則顯示登入連結,否則顯示評論表單,未登入的情況應顯示:
- 避免重複送出評論,所以在送出評論的按鈕的
disabled屬性加入loadingCreateReview的狀態判斷
<Row className='my-3'>
<Col md={6}>
<h2>商品評價</h2>
<ListGroup>
...
<ListGroup.Item>
<h2 className='my-3'>撰寫評論</h2>
{loadingCreateReview && <Loader />}
{errorCreateReview && <Message variant='danger'>{errorCreateReview}</Message>}
{successCreateReview && <Message variant='success'>評論已送出!</Message>}
{userInfo ? (
<Form onSubmit={submitReviewHandler}>
<Form.Group controlId='rating' className='my-2'>
<Form.Label>評價</Form.Label>
<Form.Control as='select' value={rating} onChange={(e) => setRating(e.target.value)}>
<option value=''>選擇評價</option>
<option value='1'>1星 - 非常差</option>
<option value='2'>2星 - 差</option>
<option value='3'>3星 - 普通</option>
<option value='4'>4星 - 好</option>
<option value='5'>5星 - 超讚</option>
</Form.Control>
</Form.Group>
<Form.Group controlId='comment'>
<Form.Label>評論</Form.Label>
<Form.Control as='textarea' rows={5} value={comment} onChange={(e) => setComment(e.target.value)} placeholder='輸入您對此商品的評論...' />
</Form.Group>
<Button type='submit' disabled={loadingCreateReview} variant='primary' className='my-2'>
送出評論
</Button>
</Form>
) : (
<Message variant='info'>
請先 <Link to='/login'>登入</Link> 再來撰寫評論
</Message>
)}
</ListGroup.Item>
</ListGroup>
</Col>
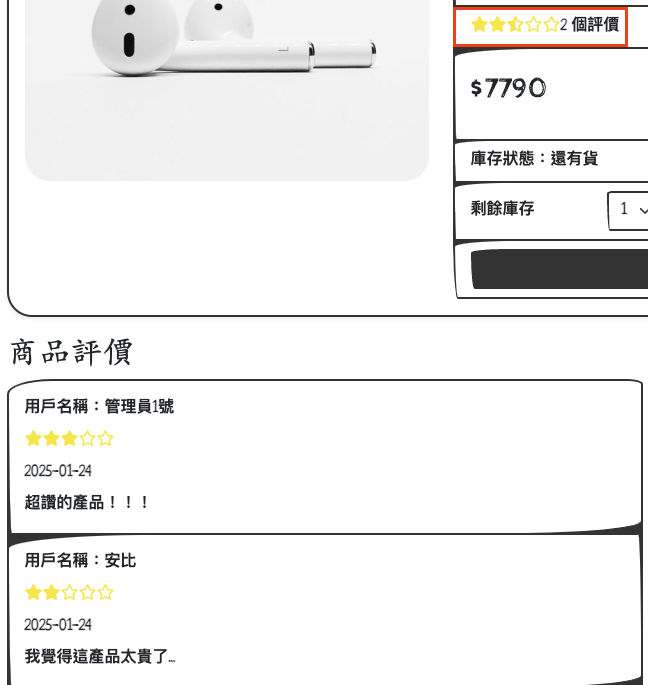
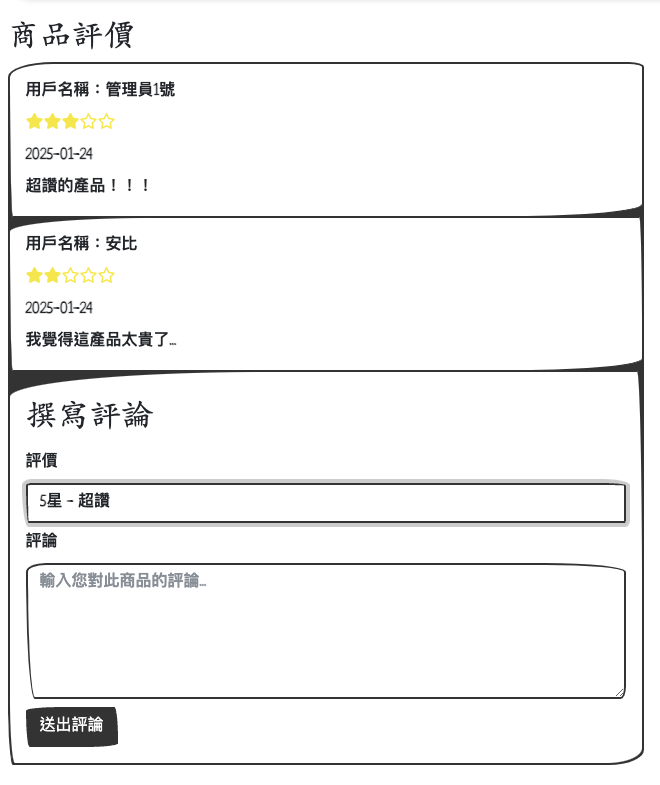
</Row>成品:
另外觀察到,當新增評論後,產品的星星數也隨之改變: