# 前言
像這種郵件發送的功能,通常會在後端處理,前端只需提供表單內容,這樣做的原因有幾個:
- 安全性:郵件發送需要 SMTP 憑證,這些不應暴露在前端程式碼
- 可靠性:Django 有成熟的郵件發送模塊(django.core.mail)
- 擴展性:後期可以輕鬆添加更多功能,如記錄表單歷史、自動回覆等
- 防濫用:可以實現速率限制、驗證碼等防護機制
# 後端
針對此專案我會額外建立一個 django app 來專門放所有與郵件相關的功能
# settings 配置郵件設定
EMAIL_HOST 是用中華電信的 SMTP 郵件伺服器,通常 TLS 連接使用的是端口 587
# settings.py
EMAIL_BACKEND = 'django.core.mail.backends.smtp.EmailBackend'
EMAIL_HOST = 'msr.hinet.net'  # 例如 smtp.yourmailserver.com
EMAIL_PORT = 587
EMAIL_USE_TLS = True
EMAIL_HOST_USER = 'your_email@yourdomain.com'
EMAIL_HOST_PASSWORD = 'your_password_or_app_password'
常見的 EMAIL_PORT 設定:
- 25: 傳統 SMTP 端口(通常被阻止)
- 587: 現代 TLS 連接的標準端口(最常用)
- 465: SSL 連接的標準端口(較舊但仍然常用)
- 2525: 一些提供商提供的替代端口
# view 撰寫 API
調用 django 的 EmailMultiAlternatives 方法來發送郵件,這個方法允許我們發送 HTML 郵件和純文本郵件,並暫時用 @csrf_exempt decorator 來略過檢查 CSRF 令牌,以便於測試,讓前端能直接發送 POST 請求,實際上在生產環境中應該使用 CSRF 保護
from django.http import JsonResponse
from django.core.mail import EmailMultiAlternatives
from django.views.decorators.csrf import csrf_exempt
import json

@csrf_exempt
def send_contact_email(request):
    if request.method == 'POST':
        try:
            data = json.loads(request.body)

            # 提取表單數據
            subject = data.get('subject', '網站聯絡表單')
            html_content = data.get('html', '')
            from_email = 'your_email@yourdomain.com'  # 發件郵箱
            to_email = data.get('to', 'loyang0921@gmail.com') # 收件郵箱
            reply_to = data.get('replyTo', 'loyang0921@gmail.com') # 回覆地址

            # 創建郵件
            email = EmailMultiAlternatives(
                subject=subject,
                body='',  # 純文本內容,這裡為空
                from_email=from_email,
                to=[to_email],
            )

            # 添加回覆地址
            if reply_to:
                email.reply_to = [reply_to]

            # 添加HTML內容
            email.attach_alternative(html_content, "text/html")

            # 發送郵件
            email.send()

            return JsonResponse({'success': True, 'message': '郵件已成功發送'})

        except Exception as e:
            return JsonResponse({'success': False, 'message': f'發送失敗: {str(e)}'}, status=500)

    return JsonResponse({'success': False, 'message': '僅支持POST請求'}, status=405)
記得這邊程式碼中的寄件人地址應與 settings 的 EMAIL_HOST_USER 相同
# url 添加 API 路由端點
# api/contact/urls.py
urlpatterns = [
    path('send-email/', views.send_contact_email, name='send_contact_email'),
]
# Postman 測試寄信 API
- 選擇 POST 方法
- URL:
http://localhost:8000/api/contact/send-email/ - 方法: POST
- Body (raw, JSON):
並在 body 中塞入以下寄信資訊
{
"subject": "測試聯絡表單郵件",
"html": "<h1>測試郵件</h1><p>這是一封用 TLS 端口測試郵件,用於驗證郵件發送功能是否正常工作。</p>",
"to": "loyang0921@gmail.com",
"replyTo": "test@example.com"
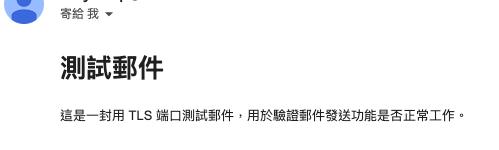
}基本上沒問題應就會執行「郵件已成功發送」的成功回傳訊息:

檢查信箱是否有收到:
# 前端
這邊目的是要能將用戶填寫的聯絡表單資訊以及下拉選項所選的資訊儲存至變數中,然後將這些資訊傳遞給後端的 send-email API 進行郵件發送
# 定義型別
在 ContactFormProps 中定義表單元件 ContactPage 的 props 型別,提供 TypeScript 正確的型別檢查和自動補全功能
interface ContactFormProps {
 // 基本配置
 onSubmit?: (formData: { project?: string, brand?: string, productName?: string,...}) => void; // 表單提交回調函數
 initialValues?: {
  // 表單初始值
  project?: string,
  brand?: string,
        ...
 };
 // 自定義選項
 consultingOptions?: Array<{ value: string, label: string }>; // 諮詢專案選項
    ...
}
# 設置表單狀態
在 ContactPage 頁面元件中,使用 useState 來設置表單的狀態,並將 initialValues 作為初始值傳入
// 設置表單內容初始值
const [formData, setFormData] = React.useState({
 project: initialValues.project || "",
 brand: initialValues.brand || "",
 productName: initialValues.productName || "",
 customerName: initialValues.customerName || "",

 email: initialValues.email || "",
 message: initialValues.message || "",
});
initialValues 是在開頭的 ContactPage 元件中傳入的 props,讓使用者在頁面加載時看到預設的值
const ContactPage: React.FC<ContactFormProps> = ({
 onSubmit,
 initialValues = {},
 consultingOptions: customConsultingOptions,
 brandOptions: customBrandOptions,
 submitButtonText = "提交表單",
 title = "聯絡我們",
 description = "請填寫以下資訊,我們會盡快回覆您",
 businessHours = "10:00-16:00 (週六、周日、公休日、黃金周、暑假、年末年初等除外)",
}) => {
    ...
}
# 下拉選項及表單內容更新
handleChange:文本輸入框的變更handleSelectChange:下拉選單內容的變更
這兩個函數都是負責處理文本輸入欄位 text 及 下拉選單 select 的變更事件,並即時更新 formData 的狀態
- 它接收一個事件對象 e,該對象的類型是 React.ChangeEvent,並且限制了事件來源只能是 HTMLInputElement 或 HTMLTextAreaElement
- 使用解構賦值 const { id, value } = e.target 從事件目標中提取 id 和 value 屬性:
- id 是元素的 id 屬性(例如
<input id="email">) - value 是用戶輸入的新值
- id 是元素的 id 屬性(例如
- 調用 setFormData 來更新狀態,使用函數式更新模式:
- prev 參數代表前一個狀態值
- ...prev 使用展開運算符保留所有現有的表單數據
- id: value 使用計算屬性名語法,只更新與輸入欄位 id 匹配的屬性
// 處理輸入變更
const handleChange = (e: React.ChangeEvent<HTMLInputElement | HTMLTextAreaElement>) => {
 const { id, value } = e.target;
 setFormData((prev) => ({
  ...prev,
  [id]: value,
 }));
};

// 處理選擇變更
const handleSelectChange = (name: string, value: string) => {
 setFormData((prev) => ({
  ...prev,
  [name]: value,
 }));
};
...
return (
    <div className='space-y-2'>
        <Label htmlFor='brand'>品牌</Label>
        <Select
            value={formData.brand}
            onValueChange={(value) => handleSelectChange("brand", value)}
        >
            <SelectTrigger className='w-full'>
                <SelectValue placeholder='請選擇' />
            </SelectTrigger>
            <SelectContent>
                {brandOptions.map((option) => (
                    <SelectItem
                        key={option.value}
                        value={option.value}
                    >
                        {option.label}
                    </SelectItem>
                ))}
            </SelectContent>
        </Select>
        <p className='text-xs text-gray-400'>※必填欄</p>
    </div>
...
    {/* 商品名 */}
    <div className='space-y-2'>
        <Label htmlFor='productName'>商品名</Label>
        <Input
            id='productName'
            placeholder='請輸入產品名稱'
            value={formData.productName}
            onChange={handleChange}
        />
        <p className='text-xs text-gray-400'>※必填欄</p>
    </div>
)
# email 內容初始格式化函數
在 ContactPage(聯絡我們)頁面元件中添加用於格式化郵件內容的函數:
const formatEmailContent = () => {
 // 查找項目和品牌的標籤文字
 const projectLabel = consultingOptions.find((o) => o.value === formData.project)?.label || formData.project;
 const brandLabel = brandOptions.find((o) => o.value === formData.brand)?.label || formData.brand;

 return `
    <h2>網站聯絡表單提交</h2>

    <h3>基本資訊</h3>
    <p><strong>諮詢方案:</strong> ${projectLabel}</p>
    <p><strong>品牌:</strong> ${brandLabel}</p>
    <p><strong>商品名:</strong> ${formData.productName}</p>

    <h3>聯絡人資訊</h3>
    <p><strong>姓名:</strong> ${formData.customerName}</p>
    <p><strong>電子郵件:</strong> ${formData.email}</p>

    <h3>查詢內容</h3>
    <p>${formData.message.replace(/\n/g, "<br>")}</p>

    <hr>
    <p><small>此郵件由網站聯絡表單自動生成。發送時間: ${new Date().toLocaleString()}</small></p>
  `;
};
這個函數會根據表單的內容生成一個 HTML 格式的郵件內容,並在發送郵件時使用
接著在 handleSubmit 函數中,將 formatEmailContent 函數的回傳值傳入 API 的 html 參數中:
showAlert是我自己開發的客製化文字提示函數用來替換原本瀏覽器預設的alert用api.post的api是我自己封裝的 axios 實例,是在專案中統一配置 baseURL 用的,來避免將請求API的URL完整硬寫死在程式碼中
,詳情可看 這篇文章
// 處理表單提交
const handleSubmit = async (e: React.FormEvent) => {
// 阻止默認提交行為
e.preventDefault();
// 表單驗證
if (!formData.project || !formData.brand || !formData.productName || !formData.customerName || !formData.email || !formData.message) {
showAlert("提示", "請填寫所有必填欄位", false);
return;
}
// 如果提供了onSubmit回調,使用它處理提交
if (onSubmit) {
onSubmit(formData);
return;
}
// 設置loading狀態
setLoading(true);
try {
// 準備API請求數據
const emailData = {
subject: `網站聯絡表單 - ${formData.productName}`,
html: formatEmailContent(),
to: "xxx@gmail.com", // 您的收件郵箱
replyTo: formData.email,
formData: formData, // 同時傳送原始表單數據,以備後端需要
};
// console.log("發送數據:", JSON.stringify(emailData, null, 2));
// 發送API POST請求
const { data } = await api.post("/api/contact/send-email/", emailData, {
headers: {
"Content-Type": "application/json",
},
});
// console.log("HTTP狀態:", response.status, response.statusText);
if (data && data.success) {
showAlert("提示", "表單已成功提交,我們將盡快回覆您", true);
// 重置表單
setFormData({
project: "",
brand: "",
productName: "",
customerName: "",
email: "",
message: "",
});
} else {
throw new Error(data.message || "提交失敗");
}
} catch (error) {
console.error("提交表單時出錯:", error);
if (axios.isAxiosError(error)) {
showAlert("錯誤警告", `提交失敗: ${error.response?.data?.message || error.message}`, false);
} else {
showAlert("錯誤警告", `提交失敗: ${error instanceof Error ? error.message : "未知錯誤"}`, false);
}
} finally {
setLoading(false);
}
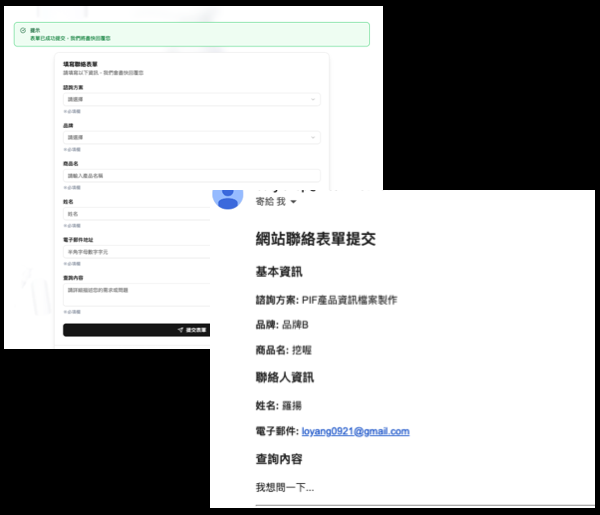
};# 成功畫面
當 API 請求成功後,就會顯示自己開發的提示框,提示用戶郵件已成功發送,並重置表單內容及更新提示框的狀態