# 前言
本專案選擇 martor 作為後台的文章內文 Markdown 編輯器,比 ckeditor 更輕量化且支援 Markdown 語法,還有提供預覽、支援圖片上傳...功能等功能
# martor 編輯器套件設定
安裝套件
pip install martor然後在 settings.py 進行基本設定
# settings.py

INSTALLED_APPS = [
    # ...
    'martor',
    # ...
]

# Martor 配置
MARTOR_ENABLE_CONFIGS = {
    'emoji': 'true',
    'imgur': 'true',
    'mention': 'false',
    'jquery': 'true',
    'living': 'false',
    'spellcheck': 'false',
    'hljs': 'true',
}
MARTOR_UPLOAD_URL = '/api/uploader/'  # 圖片上傳 API URL
並在 urls.py 中添加此編輯器的路由
# backend/urls.py
from django.urls import path, include

urlpatterns = [
    # ...
    path('martor/', include('martor.urls')),
    # ...
]
然後修改 Post 模型的 content 欄位,將 TextField 改為 MartorField,並且 migrate 到資料庫
# api/blog/models.py
from martor.models import MartorField
class Post(models.Model):
"""文章模型"""
...
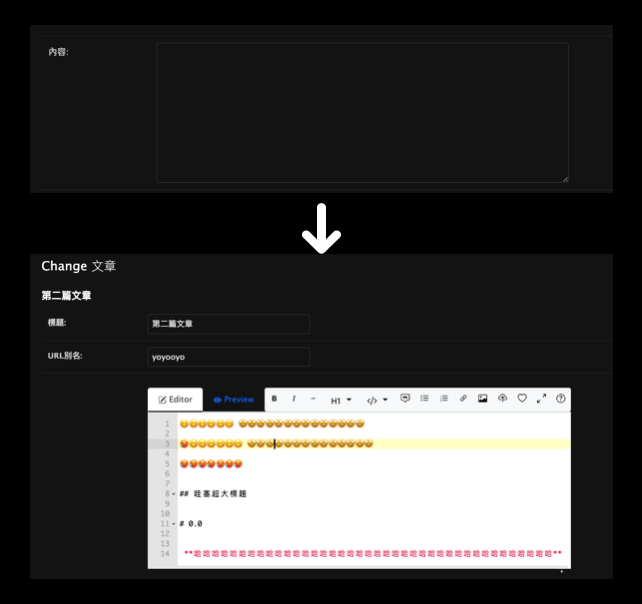
content = MartorField(verbose_name="內容")此時到後台去看,應就能看到原本的 TextField 變成編輯器了
# 後端
要成功讓 前端渲染 Markdown 內容,後端必須要有一個 API 來提供 Markdown 的內容,這邊使用 Django REST Framework (DRF) 來提供
# 解析並新增 Markdown 欄位
安裝 Python 的 Markdown 解析庫
pip install markdown# serializer
在 PostDetailSerializer 中添加一個方法或函數來返回轉換後的 HTML 內容,為防止 XSS 攻擊,使用 bleach 套件來清理輸出的 HTML:
class PostDetailSerializer(serializers.ModelSerializer):
    content_html = serializers.SerializerMethodField()

    ...
    def get_content_html(self, obj):
        """返回 Markdown 轉換後的 HTML 內容"""
        html = markdown.markdown(
            obj.content,
            extensions=['extra', 'codehilite', 'toc']
        )
        # 安全處理 HTML
        allowed_tags = [
            'a', 'abbr', 'acronym', 'b', 'blockquote', 'code', 'em', 'i', 'li', 'ol',
            'pre', 'strong', 'ul', 'h1', 'h2', 'h3', 'h4', 'h5', 'h6', 'p', 'img',
            'table', 'thead', 'tbody', 'tr', 'th', 'td', 'span', 'div'
        ]
        allowed_attrs = {
            'a': ['href', 'title', 'target'],
            'img': ['src', 'alt', 'title', 'width', 'height'],
            'code': ['class'],
            'pre': ['class'],
            '*': ['class']  # 允許所有元素有 class 屬性,用於樣式
        }
        return bleach.clean(html, tags=allowed_tags, attributes=allowed_attrs)
# 前端
要在前端成功渲染 Markdown 內容,就必須自己寫各個標籤的 CSS,但這邊不用這麼麻煩,剛好 tailwind 就有大神做出
tailwindcss-typography,針對 Markdown 內容或從 CMS 中提取的 HTML)添加漂亮且對應的樣式,這邊下載直接使用就好
安裝指令
npm install -D @tailwindcss/typography然後到專案的主 CSS 配置檔案中,添加:
plugin "@tailwindcss/typography";最後在內文套用 prose 類別即可,並將 post.content 改為抓 post.content_html,這樣就能成功渲染 Markdown 內容了
// pages/blog/blog-detail-page.js
...
<article className='prose lg:prose-xl max-w-none mb-10' dangerouslySetInnerHTML=<!--swig0--> />
# 結論
- 後端:原始 Markdown 內容存儲在資料庫中
- API:返回原始 Markdown 內容和轉換後的 HTML
- 前端:使用 Tailwind Typography 樣式渲染 HTML 內容
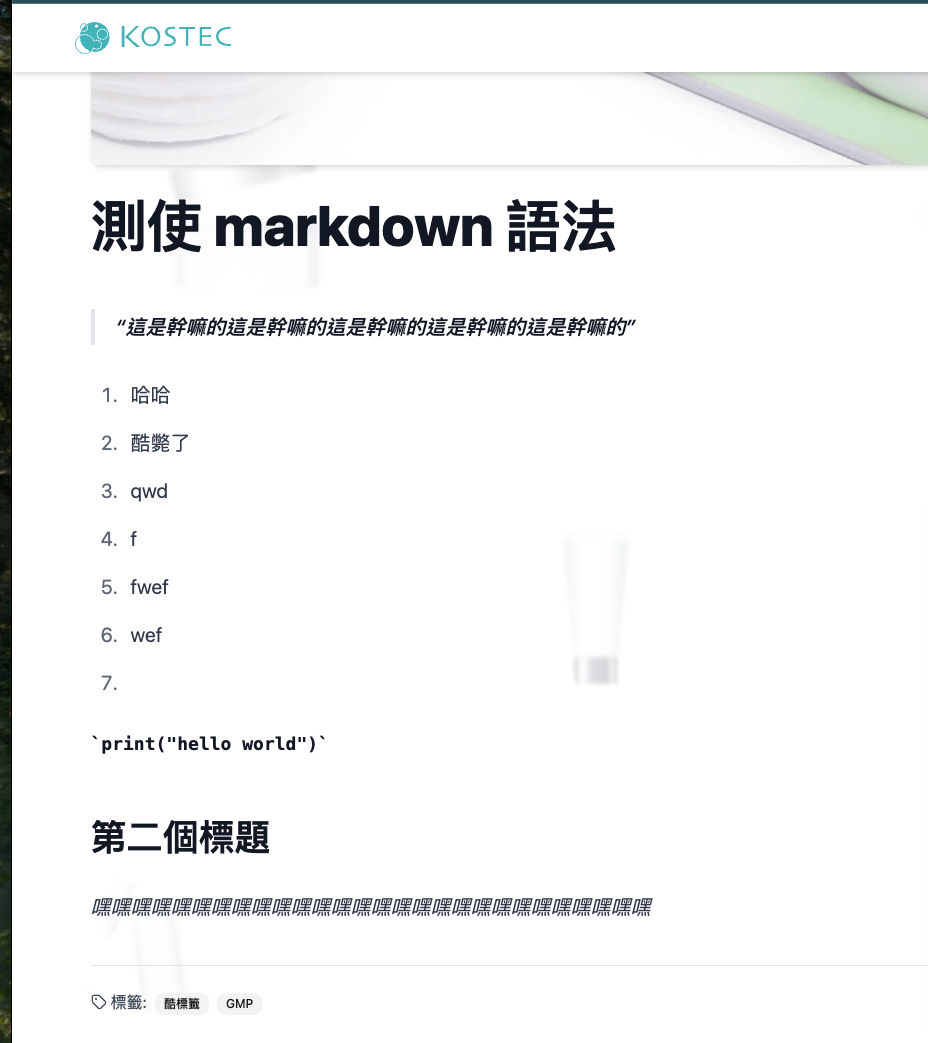
成果: