# 後端
整體後端大致工作流程為
- ORM 模型設計
- serializer 開發
- View 開發
- URL 路由配置
- API 測試與驗證(Postman / DRF)
# ER Model
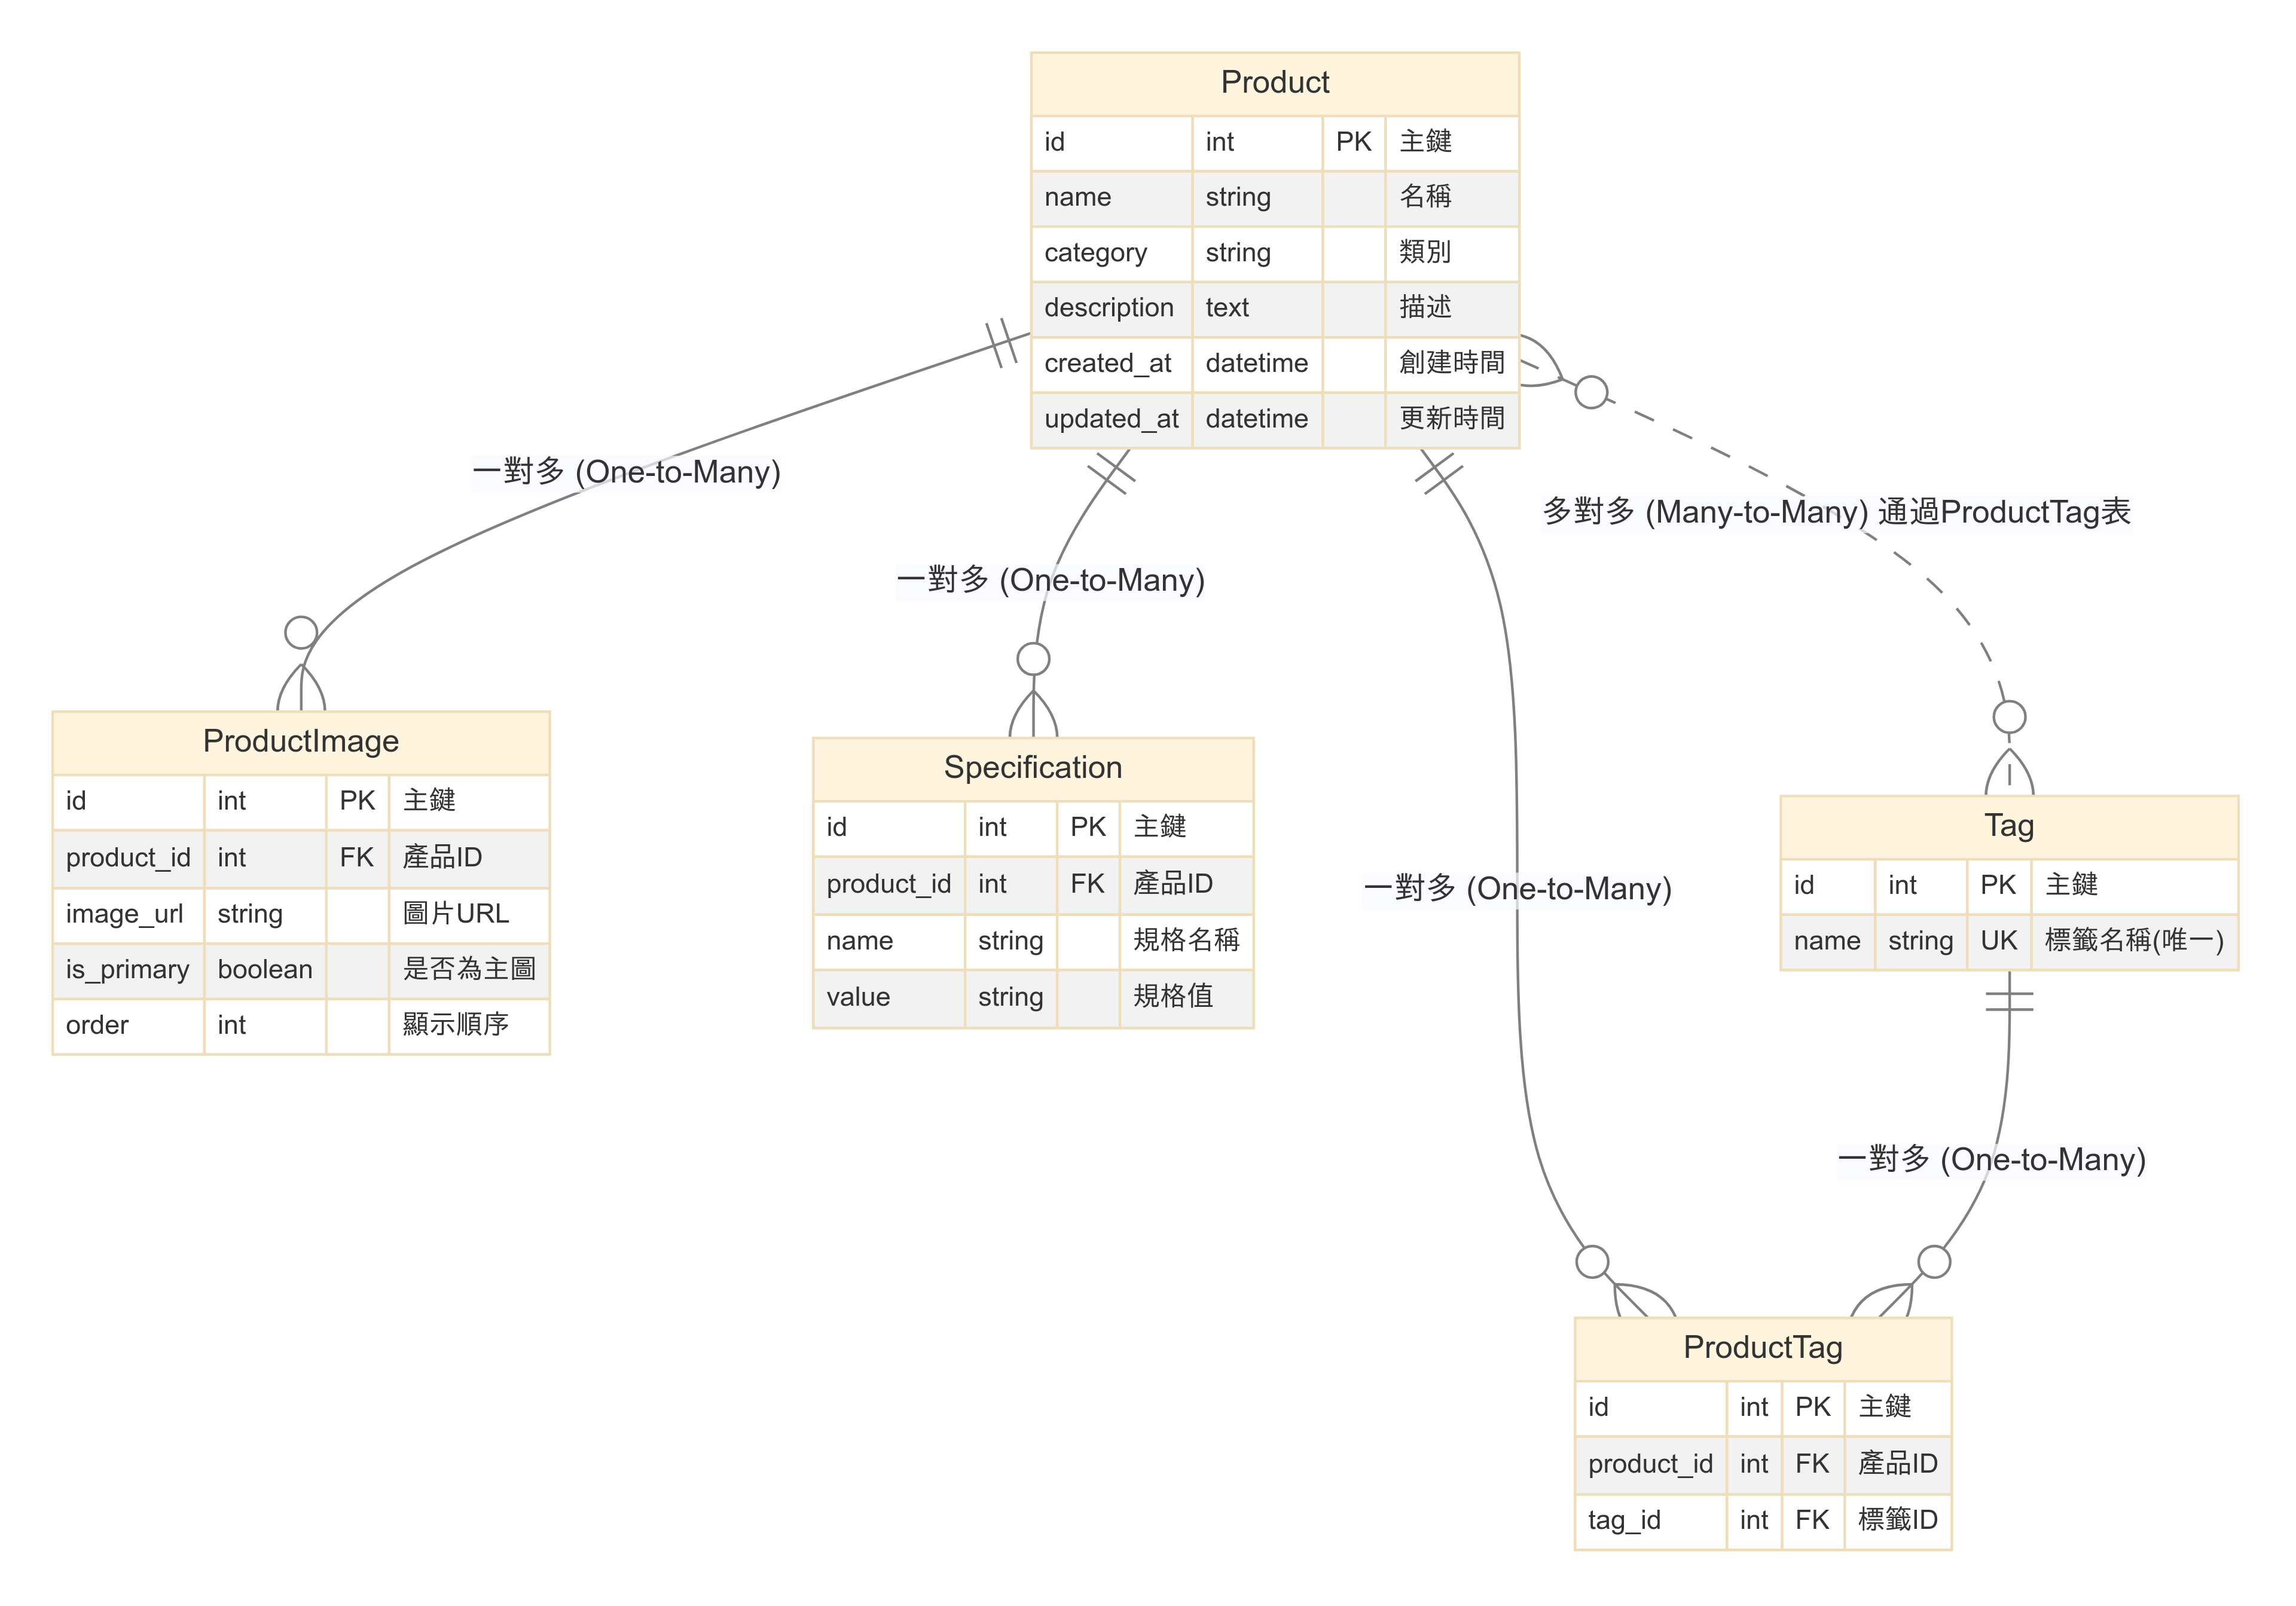
✅ Product 與其他表的關聯:
- ProductImage(產品圖片) → 一對多 (One-to-Many)
- Specification(產品規格) → 一對多 (One-to-Many)
- ProductTag(產品標籤關聯表) → 多對多 (Many-to-Many)
- Tag(標籤) → 透過 ProductTag 建立多對多關係
2️⃣ ProductImage(產品圖片表)
ProductImage 和 Product → 一對多 (One-to-Many)
- 一個產品可以有多張圖片
- 每張圖片只屬於一個產品
- is_primary 用來標記主圖
3️⃣ Specification(產品規格表)
Specification 和 Product → 一對多 (One-to-Many)
- 一個產品可以有多個規格(例如顏色、容量等)
- 每個規格只對應到一個產品
4️⃣ Tag(標籤表)
Tag 和 Product → 多對多 (Many-to-Many)(透過 ProductTag 來關聯)
📌 關聯: ProductTag 建立產品與標籤的多對多關係
- 一個產品可以有多個標籤
- 一個標籤也可以對應到多個產品
- 需要透過 ProductTag 作為關聯表來管理多對多關係
5️⃣ ProductTag(產品標籤關聯表)
ProductTag 和 Product、Tag → 多對多 (Many-to-Many)
# 為何需要拆分成 ProductTag 及 Tag 兩張資料表?
Product 與 ProductTag 資料表是多對多關係,而這多對多需要透過 ProductTag 來建立關聯,才能讓 Product 與 Tag 之間建立多對多關係。
# 錯誤範例
如果我們不使用 tags 表,而是直接在 product_tags 存放標籤文字,資料表可能會長這樣:
| d | product_id | tag |
|---|---|---|
| 1 | 101 | 有機 |
| 2 | 101 | 純素 |
| 3 | 102 | 有機 |
| 4 | 103 | 環保 |
| 5 | 104 | 有機 |
這樣的問題是:
- 標籤文字會重複出現(例如 有機 出現了 3 次)
- 難以變更標籤名稱——如果我們要將所有 有機 改成 有機認證,需要更新所有相關記錄,這在大規模應用時效率低下
- 不方便統計與管理——例如,我們想知道有哪些產品用了 有機 這個標籤,查詢可能會變慢,因為它不是 id 參照
# 正確範例
使用 tags 表 + product_tags 關聯表,將標籤名稱存到 tags 表,然後讓 product_tags 只存對應的 tag_id:
✅ Tags 表(只存 唯一標籤):
| id | name |
|---|---|
| 1 | 有機 |
| 2 | 純素 |
| 3 | 環保 |
✅ Product_tags 表(存產品與標籤的關係):
| id | product_id | tag_id |
|---|---|---|
| 1 | 101 | 1 |
| 2 | 101 | 2 |
| 3 | 102 | 1 |
| 4 | 103 | 3 |
| 5 | 104 | 1 |
優點:
- 標籤不會重複存放,有機 只會出現在 tags 表 一次,但可以透過 product_tags 關聯到多個產品。
- 修改標籤更容易,如果我們想把 有機 改成 有機認證,只需要在 tags 表修改一筆記錄,而不是更新所有 product_tags 的行。
- 查詢效率更高,可以用 JOIN 查詢特定標籤的所有產品,而不需要搜尋 text 欄位,這在大數據場景下是更高效的做法。
注意在設計欄位名稱時,不需要將 ForeignKey 欄位的名稱改為 product_id 和 tag_id,直接使用 product 和 tag 會比較 Pythonic,並符合 Django 的命名習慣。
當使用 ForeignKey 時,Django 就會自動會在資料庫內部建立 product_id 和 tag_id 欄位。
例如:
class ProductTag(models.Model):
    product = models.ForeignKey(Product, on_delete=models.CASCADE)
    tag = models.ForeignKey(Tag, on_delete=models.CASCADE)
Django 會自動在資料庫中創建:
CREATE TABLE product_tag (
    id SERIAL PRIMARY KEY,
    product_id INTEGER REFERENCES product(id),
    tag_id INTEGER REFERENCES tag(id)
);
# 為何 Image 欄位不直接放在 Product 資料表中?
首先重點:關聯式資料庫的一個基本原則是 「一個欄位應該只存一個值」
# 錯誤範例
傳統最法會直接 Product 資料表中加入 image 欄位,若有多張圖再用逗號區隔,但這樣的做法有以下問題:
- 考慮到一個產品可能除了主圖外還有多張說明、副圖,如果直接在 Product 資料表中加入 image 欄位,並用逗號分隔(千萬不要),這種做法在關聯式資料庫 (RDBMS) 中會帶來很多問題!
- 難以查詢、篩選、排序或過濾單張圖片,如果你想取得第一張圖片,就得手動切割字串
- 更新不方便,如果要刪除其中一張圖片,得重新存整個字串
# 正確範例
把所有的圖片都放到 ProductImage,然後增加 is_primary 欄位來標記主圖。 這樣可以:
✅ Product 表(產品表)
| id | name | category | created_at | updated_at |
|---|---|---|---|---|
| 1 | 電視 | 3C | 2025-03-10 12:00:00 | 2025-03-10 12:30:00 |
| 2 | 水壺 | 日常用品 | 2025-03-10 12:10:00 | 2025-03-10 12:40:00 |
✅ ProductImage 表(產品圖片表)
| id | product_id | image_url | is_primary | order |
|---|---|---|---|---|
| 1 | 1 | https://example.com/image1.jpg | TRUE | 0 |
| 2 | 1 | https://example.com/image2.jpg | FALSE | 1 |
| 3 | 1 | https://example.com/image3.jpg | FALSE | 2 |
| 4 | 2 | https://example.com/image4.jpg | TRUE | 0 |
| 5 | 2 | https://example.com/image5.jpg | FALSE | 1 |
這樣設計才能確保圖片關聯性、提高查詢效率、方便 API 回傳 JSON、未來可以支援更多圖片類型(輪播圖、縮圖、主圖)
# ORM 模型
最終的 ORM 模型如下:
# api/products/models.py
class Tag(models.Model):  # 標籤資料表
    name = models.CharField(max_length=255, unique=True)

    class Meta:
        verbose_name = "標籤"
        verbose_name_plural = "標籤們"

    def __str__(self):
        return self.name

class Product(models.Model):
    name = models.CharField(max_length=255)
    category = models.CharField(max_length=255)
    description = models.TextField(max_length=200, null=True, blank=True)  # blank=True 可以不填
    created_at = models.DateTimeField(auto_now_add=True)
    updated_at = models.DateTimeField(auto_now=True)

    # 添加多對多關係
    tags = models.ManyToManyField(Tag, through='ProductTag', related_name='products',verbose_name="標籤")

    class Meta:
        verbose_name = "產品"
        verbose_name_plural = "產品列表" # 複數名稱

    def __str__(self):
        return self.name


class ProductTag(models.Model):  # 產品標籤-中間表
    product = models.ForeignKey(Product, on_delete=models.CASCADE)
    tag = models.ForeignKey(Tag, on_delete=models.CASCADE)  # 產品刪除時,標籤也同步刪除

    def __str__(self):
        return f"{self.product.name} - {self.tag.name}"
...
ProductTag 為建立 Product 和 Tag 之間的多對多關係中間表,負責儲存產品 ID 和標籤 ID 之間的關聯
# cor-header 設定
開始之前,需先設定 CORS Header,讓前端可以存取後端 API
# serializer 設計
# api/products/serializers.py
class ProductSerializer(serializers.ModelSerializer):
    images = ProductImageSerializer(many=True, read_only=True)
    specifications = SpecificationSerializer(many=True, read_only=True)
    tags = serializers.SerializerMethodField()

    class Meta:
        model = Product
        fields = ['id', 'name', 'category', 'description', 'created_at', 'updated_at', 'images', 'specifications', 'tags']

    def get_tags(self, obj):
        return [tag.name for tag in Tag.objects.filter(producttag__product=obj)]
# view 設計
使用 DRF 的 ListAPIView 來實作產品列表的 API,並且使用 ProductSerializer 來序列化資料
# api/products/views.py
from api.models import Product
from api.serializer import ProductSerializer
from rest_framework import generics

class ProductListView(generics.ListAPIView):
    queryset = Product.objects.all()
    serializer_class = ProductSerializer
# url 路由
# api/products/urls.py
from django.urls import path
from api.views.product_views import ProductListView

urlpatterns = [
    path('', ProductListView.as_view(), name='product-list'),  # 這樣 /api/products/ 會直接對應到列表
]
而此路由檔案則會存放所有不同功能的路由
# backend/urls.py
urlpatterns = [
    path('admin/', admin.site.urls),
    path('api/products/', include('api.urls.product_urls')),
]
# 註冊 DRF
若沒在 INSTALLED_APPS 中註冊 DRF,會發現有 TemplateDoesNotExist at /api/products/ 的錯誤
# settings.py
INSTALLED_APPS = [
...
# DRF
'rest_framework',
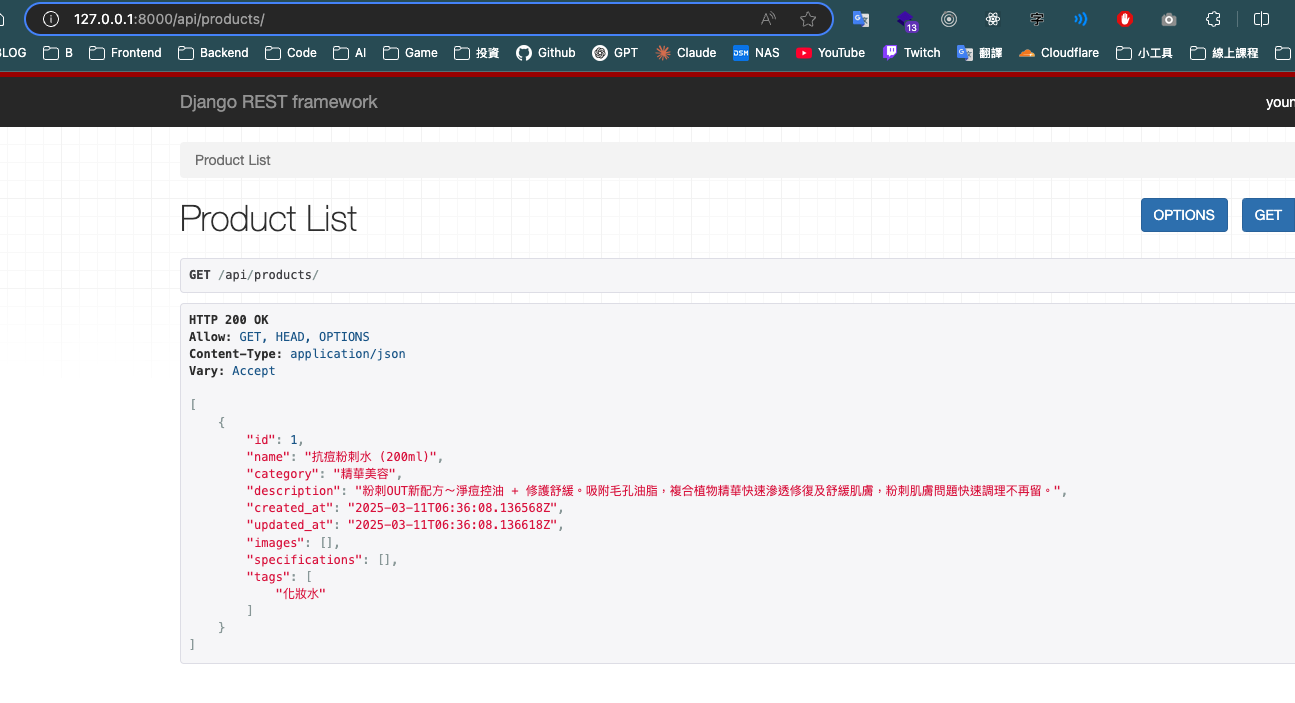
]此時再去訪問 http://127.0.0.1:8000/api/products/ 才能看到 DRF 的 API 界面
# 前端
要改的地方有大約有以下幾個:
# axiosInstance API 請求路由更新
從原本的 dummydata 暫時改成 Django 的預設路由,等後續申請網站網域的時再更改
// api/axiosInstance.ts
const api = axios.create({
 baseURL: "http://127.0.0.1:8000", // 設定 API 基礎 URL
 timeout: 5000, // 5 秒超時
 headers: {
  "Content-Type": "application/json",
 },
});
# 型別定義更新
由於原本的型別定義是根據 DummyData 設計的,現在要改成根據 Django API 的回傳結果來設計
// types/products.ts
// 新API的產品圖片型別
export interface ProductImage {
 image_url: string;
 is_primary: boolean;
 order: number;
}

// 新API的產品型別
export interface Product {
 id: number;
 name: string;
 category: string;
 description: string;
 created_at: string;
 updated_at: string;
 images: ProductImage[];
 specifications: string[]; // 可根據實際情況調整
 tags: string[];
}
# 更新產品 API 請求路由
型別 interface 的名稱就從原本的 ProductListResponse 改成 Product,並且將路由改成 Django API 的路由
// api/products.ts
import api from "./axiosInstance";
import type { Product } from "../types/products";

export const getProducts = async (): Promise<Product> => {
 // const { data } = await api.get("/products"); // 這裡不需要寫完整 URL,dummydata
 const { data } = await api.get("/api/products/"); // 我的 API
 return data;
};
# hook 更新
更新 useProducts hook,確保它返回正確的型別
// hooks/useProducts.ts
import { Product } from "../types/products";

export const useProducts = () => {
 return (
  useQuery <
  Product >
  {
   queryKey: ["products"],
   queryFn: getProducts,
   staleTime: 1000 * 60 * 5, // 5 分鐘內不重新請求
  }
 );
};
# 前端頁面更新
此處是寫法差異最多的地方,因為原本的 dummydata 的 API 規格為:
dummydata 的 API 規格是直接在 products 陣列中放置所有產品
[
    "products": [
        {
        "id": 1,
        "title": "Essence Mascara Lash Princess",
            ...
        },
    ]
]
而自己寫的 Django API 則是將產品放在陣列中,並以數字作為 key
[
    "0": [
        {
        "id": 1,
        "title": "Essence Mascara Lash Princess",
            ...
        },
    ]
    "1": [
        ...
    ]
]
API 規格差異比對圖:
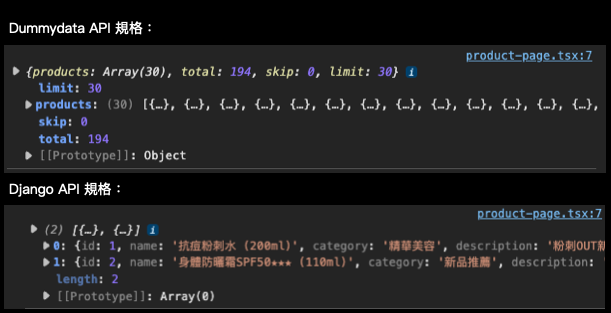
# dummydata API 的寫法(舊)
// pages/product-page.tsx

const { data, isLoading, isError, error } = useProducts();

return (
    ...
    <div className='p-5'>
        <h1 className='text-2xl font-bold mb-4'>產品列表</h1>
        <div className='grid grid-cols-3 gap-4'>
            {data?.products.map((product: Product) => (
                <div key={product.id} className='border p-4 rounded shadow'>
                    <img src={product.thumbnail} alt={product.title} className='w-full h-40 object-cover rounded' />
                    <h2 className='text-lg font-semibold mt-2'>{product.title}</h2>
                    <p className='text-sm text-gray-600'>{product.description}</p>
                    <p className='text-lg font-bold mt-2'>${product.price}</p>
                </div>
            ))}
        </div>
    </div>
);
# Django API 的寫法(新)
主要差別就在由於 API 回傳的資料結構不同,所以 data 也從原本的 data?.products 改成 data?.map,並且要確保 data 是陣列才進行 map
// pages/product-page.tsx

const { data, isLoading, isError, error } = useProducts();

reutrn (
<div className='grid grid-cols-1 sm:grid-cols-2 md:grid-cols-3 gap-8'>
    {Array.isArray(data) && data.map((product: Product) => (
        <div key={product.id} className='bg-white rounded-lg shadow-lg overflow-hidden'>
            {product.images && product.images.length > 0 ? (
                <img src={product.images[0].image_url} alt={product.name} className='w-full h-100 object-cover' />
            ) : (
                <div className='w-full h-100 bg-gray-200 flex items-center justify-center'>
                    <span className='text-gray-500'>暫無圖片</span>
                </div>
            )}
            {/* 產品其餘資訊 */}
            <div className='p-4'>
                <h2 className='text-lg font-semibold'>{product.name}</h2>
                <p className='text-sm text-gray-600 mt-2'>{product.description}</p>
                <div className='mt-3'>
                    {product.tags && product.tags.length > 0 && (
                        <div className='flex flex-wrap gap-2'>
                            {product.tags.map((tag, index) => (
                                <span key={index} className='px-2 py-1 bg-teal-100 text-teal-800 text-xs rounded-full'>
                                    {tag}
                                </span>
                            ))}
                        </div>
                    )}
                </div>
            </div>
        </div>
    ))}
</div>;
);
主要變更如下:
- 資料結構變更:
- 原本:data?.products.map((product: Product)
- 現在:data?.map((product)
- 移除了.products 的引用,因為新 API 直接返回產品陣列
- 屬性名稱變更:
- 原本:product.title → 現在:product.name
- 原本:product.thumbnail → 現在:product.images[0].image_url
- 圖片處理優化:
- 加了圖片是否存在的檢查:product.images && product.images.length > 0 && product.images[0].image_url
- 確保即使沒有圖片資訊也不會出錯
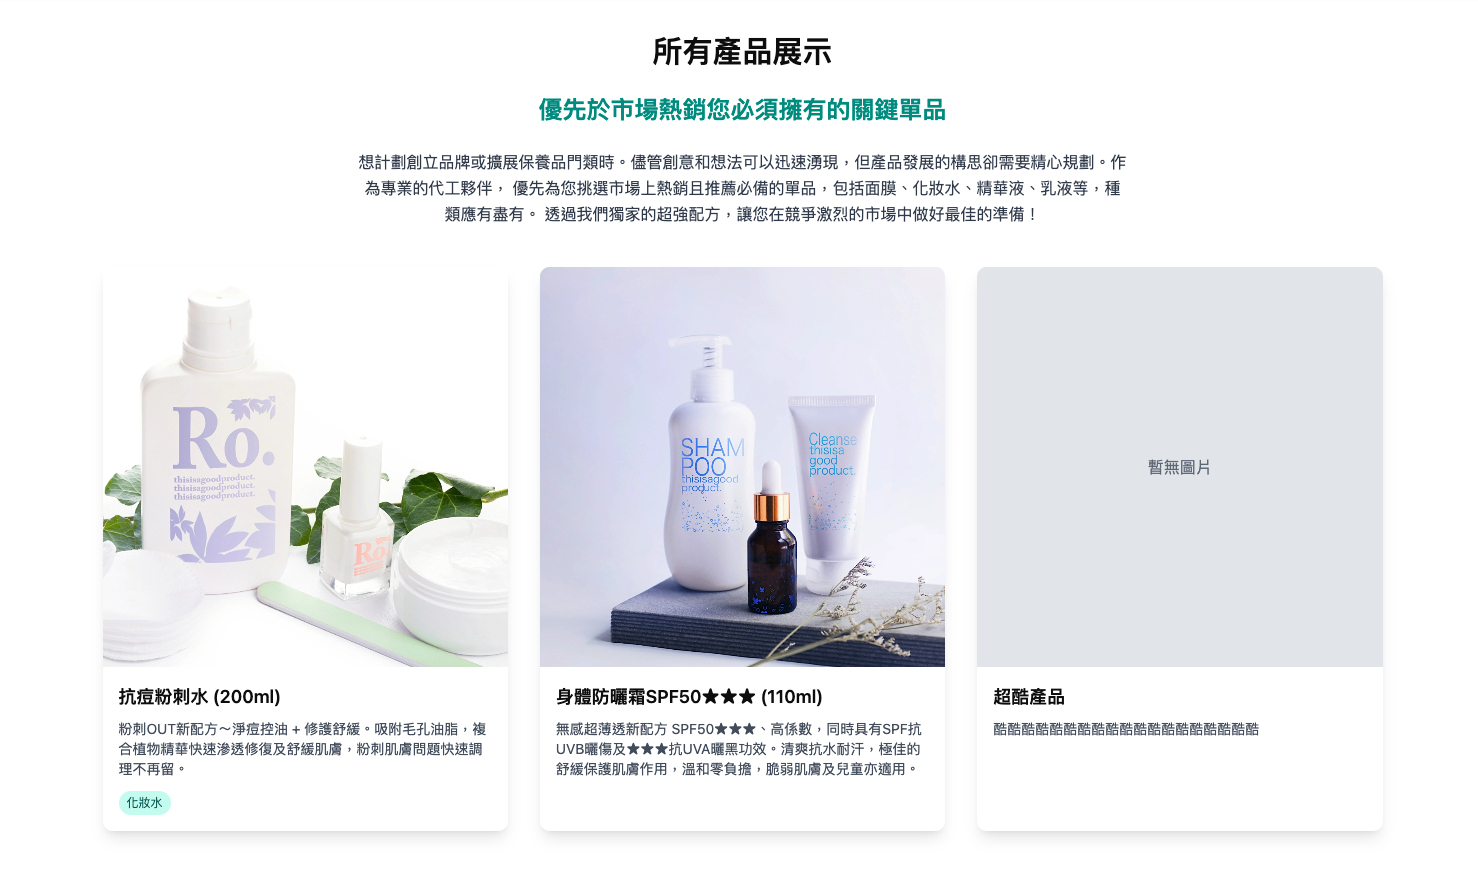
# 成果